
Setting up Your First Simple Facebook Retargeting Campaign

I recommend setting up Facebook retargeting campaigns to most of my clients. They’re great to use as part of your ‘always on’ campaign set and I’m amazed that not more businesses are using them. When done well they lead to higher conversions or more sales. Why? Because sometimes we need a few prompts before we act. Sometimes we are half way through completing an action and we have to leave it due to interruption – happens all the time, right? The correctly retargeted ad returns the focus or prompts the action. But, you want it to be targeted and timely not random and repetitious.
Step By Step Facebook Retargeting Campaign – Set Up
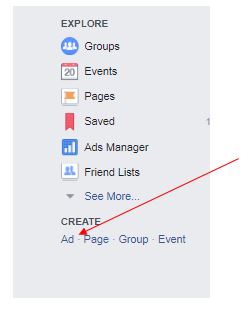
Okay, so here’s how you set up a Facebook retargeting campaign. From your desktop go to your personal or business Facebook page and click on the upside down triangle at the top right and choose “create ads” or on the bottom left of the page under the ‘create’ heading, click on ‘Ad’.
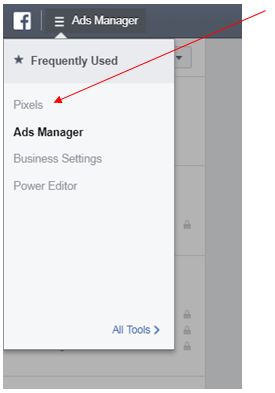
The Facebook Pixel is the code that tracks visitors to your website. The Pixel tracks visitors to your website regardless of where they come from – not just visits from Facebook.
If you haven’t already done it, you need to put the Facebook Pixel on every page of your website. Access the Pixel code via the menu on the top left.
Grab the code and copy and paste it onto every page of your website between the <head> tags or you can email it to your web developer to do it for you.
Tools to Help You Set Up Your Facebook Retargeting Campaign
If you manage your own WordPress site, you can easily install the pixel by going to the plugins in your website, select ‘new’ and search for the Pixelyoursite plugin (there are plenty of others that do a similar thing too). Now, with the plugin, it’s just a matter of putting in the Facebook Pixel ID (with this plugin you don’t have to put in the whole code) and the plugin does the rest.
If you use Chrome, download the browser extension called Facebook Pixel Helper. This has a little icon in the right hand corner of your screen that goes green when it detects a pixel. Go to your site, wander around a bit, and the pixel will go green if yours is in good working order (it will show you other sites that have the pixel too, so you can check if your competitors have installed it – should you be curious…)
Building Your Facebook Retargeting Campaign
In Facebook Ad Manager, you now see a screen asking you to choose your ad objective. Choose ‘traffic’ and put in your website URL in the box at the right.
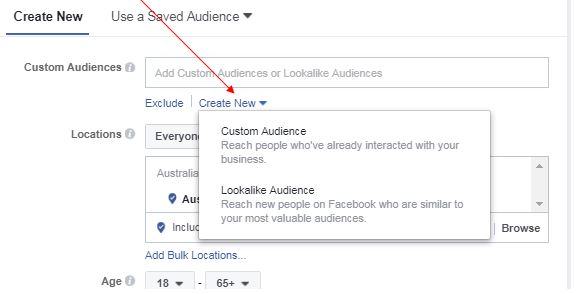
Now we choose an audience. For retargeting, we are going to choose ‘create a custom audience’ and from there choose ‘website traffic’.
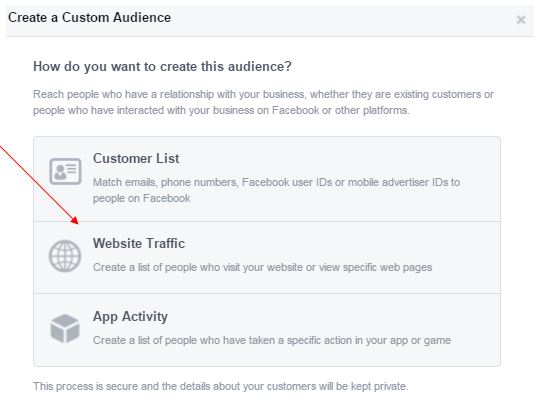
We can be more specific now and include and exclude certain types of visitors. You may wish to only create a Facebook retargeting campaign for audiences who have visited specific pages, such as the ‘new’ inventory or ‘used’ inventory on your website. You can also specify a time period for the visit up to 180 days – more recent visits for example are going to be most relevant.
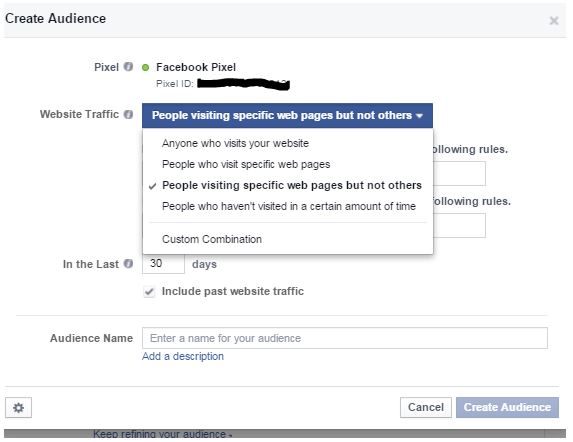
Now you can set about refining the audience by gender, age, location if you want to. Be careful here not to shrink your audience size too much.
Next set up placement, budget, schedule and duration for your ad.
Finally, you come to the creative step. Keep in mind that your ad is for people who have already visited your website or specific web pages so you want it to be particularly relevant.
Tips for Optimizing Your Facebook Retargeting Campaign
- Check in with your stats to make sure your frequency metric doesn’t rise to above 3. If it does, you’ll also most likely see your cost per action increase. This means its time to change up the creative of your ad.
- Use CPM bidding instead of CPA (cost per action) because you want the entire audience you’ve selected to see your ad. You don’t need Facebook to optimise it for you.
- Start with a small daily budget and scale up when you see that it’s working for you. If you’re not getting results, test a changed creative.
- Exlude people who have already converted by adding the exclusion URL for the “thank you page” (or equivalent) in the custom audience set up.
- Facebook recommends that you have a couple of 100 people in your custom audiences from your website, before you target it in an ad, so that your cost per action is lowered and relevance score is higher. If your audience size is too small, it will be difficult to deliver and optimize your ad properly.
If you’ve got some questions about setting up Facebook retargeting campaigns, please get in contact with us at
Drive More Business where we can help install your pixel as well as provide you with a strategy session on how best to optimise your marketing communication to your audience using the Facebook Pixel.
One thought on “Setting up Your First Simple Facebook Retargeting Campaign”